内容有:Linux开发环境搭建、Gcc编译、静态库和动态库、Makefile、GDB调试、虚拟地址空间、文件描述符、open 函数、read 函数、write 函数、lseek 函数、stat 函数、目录操作函数、dup 函数、dup2 函数、fcntl函数。
一、 Linux开发环境搭建 1 虚拟机网络地址类型的区别 Vmware 为我们提供了三种网络工作模式,
分别是:Bridged(桥接模式)、NAT(网络地址转换模式)、Host-only(仅主机模式)。
虚拟机里的虚拟交换机
VMnet0:用于虚拟桥接网络下的虚拟交换机 ;
VMnet1:用于虚拟 Host-only 网络下的虚拟交换机 ;
VMnet8:用于虚拟 NAT 网络下的虚拟交换机 。
Windows的网络连接下的虚拟网卡
VMware Network Adapter VMnet1:用于Host-Only模式的虚拟网卡 ;
VMware Network Adapter VMnet8:用于NAT模式的虚拟网卡 。
Bridged模式
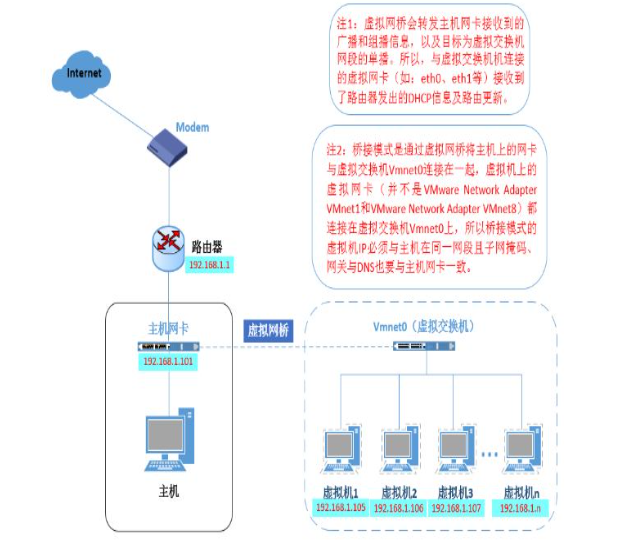
桥接模式就是将主机网卡与虚拟机虚拟的网卡利用虚拟网桥进行通讯。在桥接的做用下,相似于把物理主机虚拟为一个交换机,全部桥接设置的虚拟机链接到这个交换机的一个接口上,物理主机也一样插在这个交换机当中,因此全部桥接下的网卡与网卡都是交换模式的,相互能够访问而不干扰。在桥接模式下,虚拟机ip地址须要与主机在同一个网段,若是须要联网,则网关与DNS须要与主机网卡一致。
桥接网络是指本地物理网卡和虚拟网卡通过VMnet0虚拟交换机进行桥接,物理网卡和虚拟网卡在拓扑图上处于同等地位。物理网卡和虚拟网卡就相当于处于同一个网段,虚拟交换机 就相当于一台现实网络中的交换机。
两个网卡的IP地址也要设置为同一网段,子网掩码、网关、DNS等参数都相同。两个网卡在拓扑结构中是相对独立的,两个网卡能够互相通信。如果在网络中存在DHCP服务器, 那么虚拟网卡同样可以从DHCP服务器上获取IP地址。
桥接网络模式是VMware虚拟机中最简单直接的模式。
NAT模式
桥接模式配置简单,但若是你的网络环境是ip资源很缺乏或对ip管理比较严格的话,那桥接模式就不太适用了,这时候NAT模式是最好的选择。
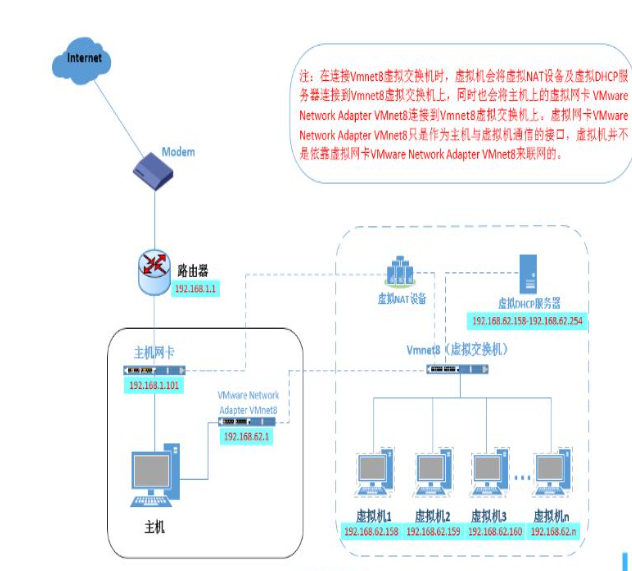
NAT模式,即地址转换模式。VMnet8虚拟机网卡默认属于NAT模式。该网络下默认打开DHCP和NAT 服务,这是由宿主机的系统服务提供。只有在服务启动情况下,这两个功能才生效。
NAT模式借助虚拟NAT设备和虚拟DHCP服务器,使得虚拟机能够联网。在NAT模式中,主机网卡直接与虚拟NAT设备相连,而后虚拟NAT设备与虚拟DHCP服务器一块链接在虚拟交换机VMnet8上,这样就实现了虚拟机联网。那么为何需要虚拟网卡VMware Network Adapter VMnet8呢?原来VMware Network Adapter VMnet8虚拟网卡主要是为了实现主机与虚拟机之间的通讯。利用虚拟的NAT设备以及虚拟DHCP服务器来使虚拟机链接外网,而VMware Network Adapter VMnet8虚拟网卡是用来与虚拟机通讯的。
在NAT网络中,VMnet8虚拟网卡被直接连接到VMnet8虚拟交换机 上与虚拟网卡进行通信。
VMnet8虚拟网卡的作用仅限于和VMnet8网段进行通信,它不给VMnet8网段提供路由功能,所以虚拟机虚拟一个NAT服务器,使虚拟网卡可以连接到Internet。在这种情况下,就可以使用端口映射功能,让访问主机80端口的请求映射到虚拟机的80端口上。
VMnet8虚拟网卡的IP地址是在安装VMware时由系统指定生成的,我们不要修改这个数值,否则会使主机和虚拟机无法通信。虚拟出来的网段和NAT模式虚拟网卡的网段是一样的,都为192.168.111.X,包括NAT服务器的IP地址也是这个网段。在安装VMware之后同样会生成一个虚拟DHCP服务器,为NAT服务器分配IP地址。
当主机和虚拟机进行通信的时候就会调用VMnet8虚拟网卡,因为他们都在一个网段,所以通信就不成问题了。实际上,VMnet8虚拟网卡的作用就是为主机和虚拟机的通信提供一个接口,即使主机的物理网卡被关闭,虚拟机仍然可以连接到Internet,使得主机和虚拟机之间就互访。
Hsot-Only模式
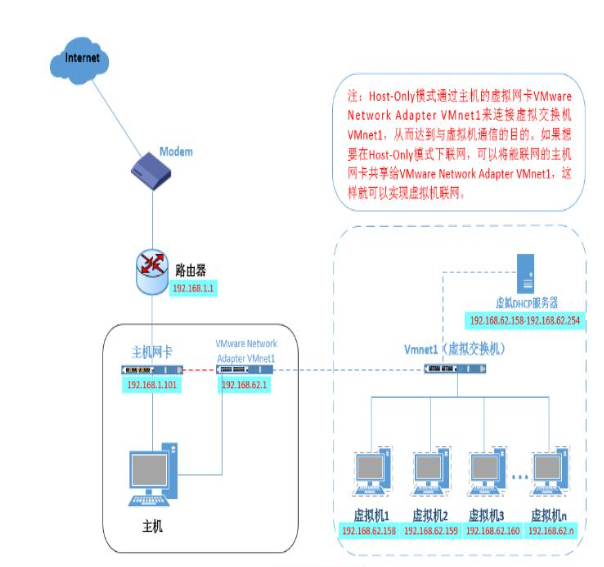
Host-Only模式其实就是NAT模式去除了虚拟NAT设备,而后使用VMware Network Adapter VMnet1虚拟网卡链接VMnet1虚拟交换机来与虚拟机通讯的,Host-Only模式将虚拟机与外网隔开,使得虚拟机成为一个独立的系统,只与主机相互通信。
在Host-Only模式下,虚拟网络是一个全封闭的网络,它唯一能够访问的就是主机。其实Host-Only网络和NAT网络很相似,不同的地方就是Host-Only网络没有NAT服务,所以虚拟网络不能连接到Internet。主机和虚拟机之间的通信是通过VMnet1虚拟网卡来实现的。
同NAT一样,VMware Network Adepter VMnet1虚拟网卡的IP地址也是VMware系统指定的,同时生成的虚拟DHCP服务器和虚拟网卡的IP地址位于同一网段,但和物理网卡的IP地址不在同一网段。Host-Only的宗旨就是建立一个与外界隔绝的内部网络,来提高内网的安全性。
参考:
VMware 虚拟机三种网络模式详解
VMware虚拟机三种网络模式详解 - JavaShuo
2 Linux里安装工具 1 2 3 4 5 6 7 8 1. 实现ssh连接的工具:sudo apt install openssh-server 2. 进行网络操作(例如ifconfig)的工具:sudo apt install net-tools 3. 安装ssh密钥(为了远程连接,使用密钥不用每次都输入密码):ssh-keygen -t rsa
3 Linux下常用操作 1 2 3 4 5 6 7 8 9 10 11 1. 清屏reset:清除所有打印项目,处理时间长。 clear:清除所有打印项目,处理时间短。 ? Ctrl + L:把滚动条置于最下方。 2. 显示目录下的文件ls:只显示名字 ll:会显示权限、时间等详细信息。 3. 显示当前路径pwd
二、 GCC编译 1 GCC GCC 原名为 GNU C语言编译器(GNU C Compiler),后来扩展为 GCC(GNU Compiler Collection,GNU编译器套件),由 GNU 开发的编程语言译器。
GNU 编译器套件包括 C、C++、Objective-C、Java、Ada 和 Go 语言前端,也包括了这些语言的库(如 libstdc++,libgcj等)。
GCC 不仅支持 C 的许多“方言”,也可以区别不同的 C 语言标准;可以使用命令行选项来控制编译器在翻译源代码时应该遵循哪个 C 标准。例如,当使用命令行参数-std=c99 启动 GCC 时,编译器支持 C99 标准。
安装命令 sudo apt install gcc g++ (版本 > 4.8.5)。
查看版本 gcc/g++ -v/–version。
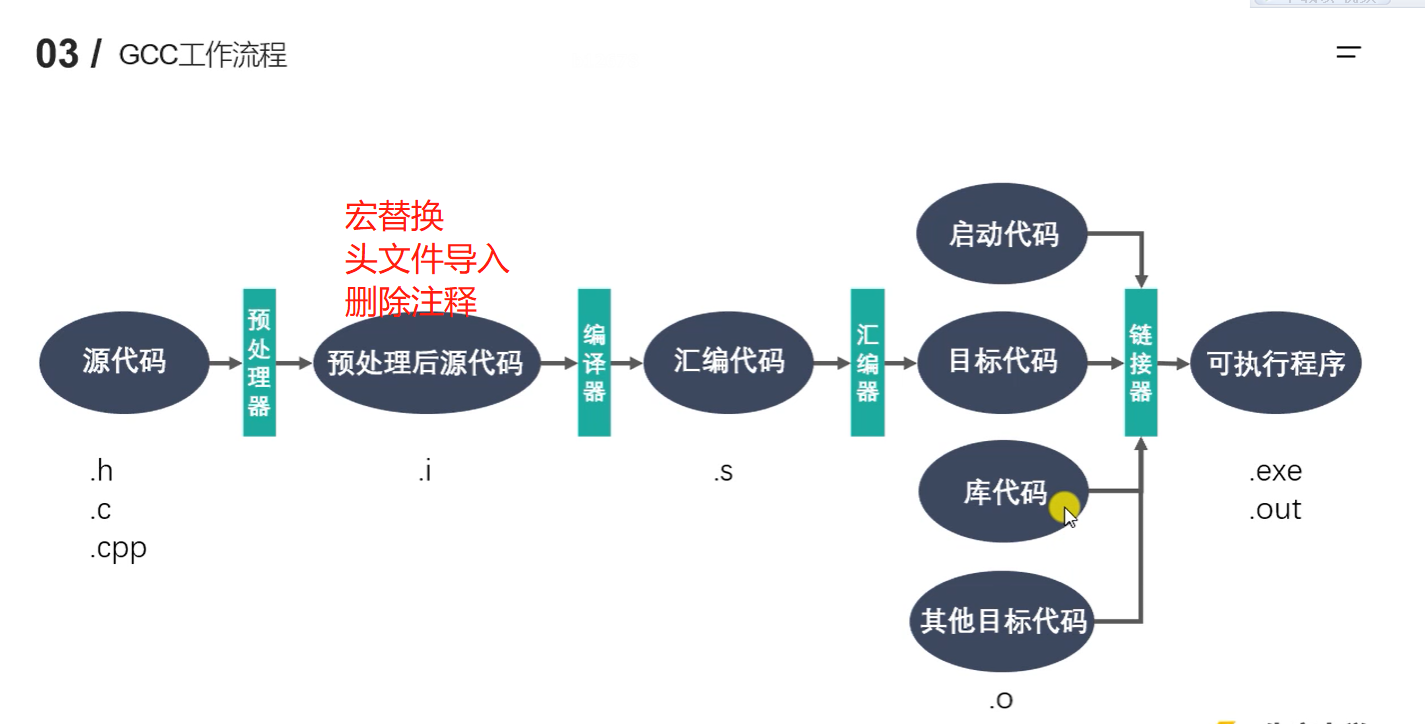
2 GCC的命令行操作 1 2 3 4 5 6 7 8 9 10 11 12 13 14 15 16 17 18 19 20 21 22 23 24 gcc的一般编译过程 1. 创建c文件 touch test.c vim test.c 2. 编译文件 gcc test.c -o test 3. 执行文件 ./test gcc工作的具体过程 1. 预处理 gcc test.c -E -o test.i 2. 编译产生汇编文件 gcc test.i -S -o test.s 3. 汇编成目标代码 (可执行) gcc test.s -C -o test.o 4. 合并成可执行文件 gcc test.o -o test
3 GCC工作流程
4 GCC常用的参数
参数
说明
-E
预处理指定的源文件,不进行编译
-S
编译指定的源文件,但是不进行汇编
-C
编译、汇编指定的源文件,但是不进行链接
-o [file1] [file2]
将文件 file2 编译成可执行文件 file1
-I 大写的i
指定 include 包含文件的搜索目录
-g
在编译的时候,生成调试信息,该程序可以被调试器调试
-D
在程序编译的时候,指定一个宏
-w
不生成任何警告信息
-Wall
生成所有警告信息
-On
n的取值范围:0~3。编译器的优化选项的4个级别,-O0表示没有优化,-O1为缺省值,-O3优化级别最高
-l 小写的L
在程序编译的时候,指定使用的库
-L
指定编译的时候,搜索的库的路径。
-fPIC / fpic
生成与位置无关的代码
-shared
生成共享目标文件,通常用在建立共享库时
-std
指定C方言,如:-std=c99,gcc默认的方言是GNU C
1 2 3 4 5 6 在对代码进行调试的时候,需要输出很多调试信息。 但是程序发布的时候,不需要这么多信息,因为这些信息会降低效率。 为了提高程序运行的效率,可以把这些输出内容的语句放在宏定义里面。 gcc test.c -D DEBUG -o test gcc test.c -DDEBUG
5 gcc和g++的区别 gcc 和 g++都是GNU(组织)的一个编译器。
后缀为 .c 的,gcc 把它当作是 C 程序,而 g++ 当作是 c++ 程序。
后缀为 .cpp 的,两者都会认为是 C++ 程序,C++ 的语法规则更加严谨一些。
编译阶段,g++ 会调用 gcc,对于 C++ 代码,两者是等价的,但是因为 gcc命令不能自动和 C++ 程序使用的库联接,所以通常用 g++ 来完成链接,为了统一起见,干脆编译/链接统统用 g++ 了,这就给人一种错觉<好像 cpp 程序只能用 g++ 似的。
误区二:gcc 不会定义 __cplusplus 宏,而 g++ 会。
实际上,这个宏只是标志着编译器将会把代码按 C 还是 C++ 语法来解释。
如上所述,如果后缀为 .c,并且采用 gcc 编译器,则该宏就是未定义的,否则,就是已定义。
误区三:编译只能用 gcc,链接只能用 g++。
严格来说,这句话不算错误,但是它混淆了概念,应该这样说:编译可以用gcc/g++,而链接可以用 g++ 或者 gcc -lstdc++。
gcc 命令不能自动和C++程序使用的库联接,所以通常使用 g++ 来完成联接。但在编译阶段,g++ 会自动调用 gcc,二者等价。
三、 静态库和动态库 库文件是计算机上的一类文件,可以简单的把库文件看成一种代码仓库,它提供给使用者一些可以直接拿来用的变量、函数或类。
库是特殊的一种程序,编写库的程序和编写一般的程序区别不大,只是库不能单独运行。
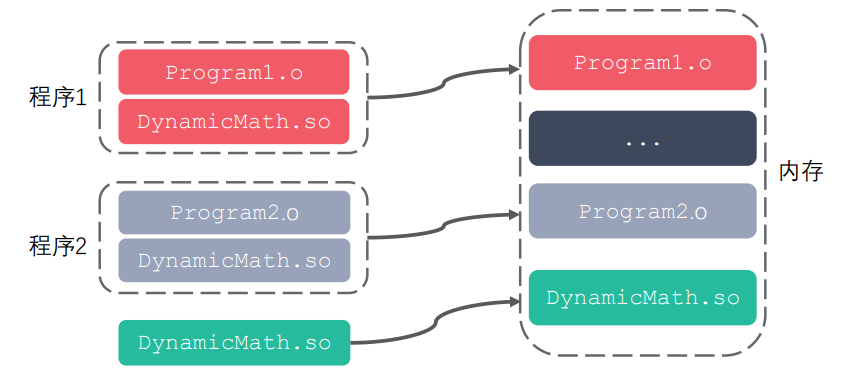
库文件有两种,静态库和动态库(共享库),区别是:静态库在程序的链接阶段被复制到了程序中;动态库在链接阶段没有被复制到程序中,而是程序在运行时由系统动态加载到内存中供程序调用。
库的好处:代码保密;方便部署和分发。
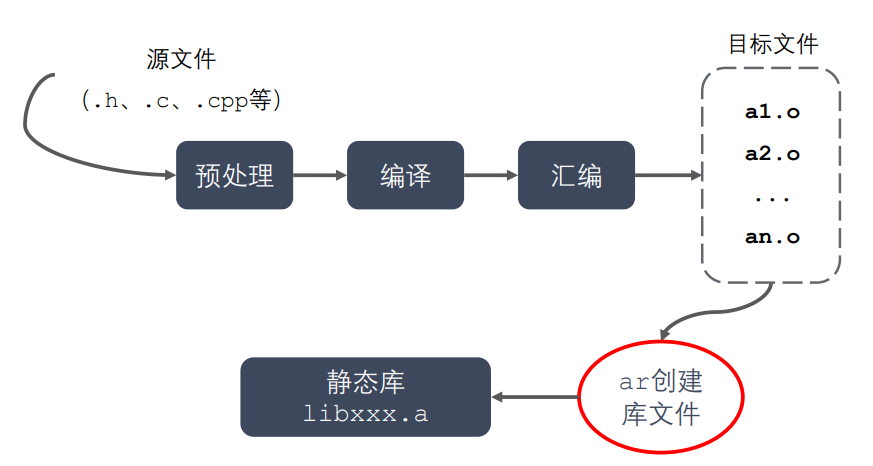
1 静态库的制作和使用 库文件放的是二进制代码。
头文件不需要打包到静态库里面去,因为在预处理的时候就已经包含在c文件里面了。
命名规则:libxxx.a。要使用lib前缀,后缀是.a。
1 2 3 4 5 6 7 8 9 10 11 制作静态库: 1 . 生成目标文件.o gcc -c add.c mult.c sub.c div .c 2 . 打包成静态文件.a ar rcs libcalc.a add.o mult.o sub.o div .o 将.o文件打包需要用到ar工具(archive) r - 将文件插入备存文件中 c - 建立备存文件 s - 索引
1 2 3 4 5 6 7 8 复制文件 cp src dst复制目录,用递归复制 cp -r src dst删除 rm ./*.o
1 2 3 4 5 6 7 8 9 10 11 12 13 14 15 16 17 18 19 20 21 22 23 24 25 26 27 28 29 30 31 32 33 34 35 使用静态库: libaray include(放的头文件) head.h lib(放库文件) libcalc.a main.c src(放源文件) div.c sub.c add.c mult.c gcc main.c -o app fatal error: head.h: No such file or directory 找不到头文件 gcc main.c -0 app -I./include/ /tmp/cc6SWL9y.o: In function `main': main.c:(.text+0x3a): undefined reference to `add' main.c:(.text+0x5c): undefined reference to `subtract' main.c:(.text+0x7e): undefined reference to `multiply' main.c:(.text+0xa0): undefined reference to `divide' 找不到库文件 gcc main.c -o app -I./include/ -lcalc 指定的是calc这个库,而不是libcalc.a这个库文件的名字 /usr/bin/ld: cannot find -lcalc 找不到库文件 gcc main.c -o app -I./include/ -lcalc -L./lib/ 指定库文件所在目录 就可以生成可执行文件了
2 动态库的制作和使用 命名规则:libxxx.so,在linux下是一个可执行文件。
静态库:GCC 进行链接时,会把静态库中代码打包到可执行程序中。
程序启动之后,动态库会被动态加载到内存中,通过 ldd (list dynamic dependencies)命令检查动态库依赖关系。
如何定位共享库文件呢?当系统加载可执行代码时候,能够知道其所依赖的库的名字,但是还需要知道绝对路径。此时就需要系统的动态载入器来获取该绝对路径。对于elf格式的可执行程序,是由ld-linux.so来完成的,它先后搜索elf文件的 DT_RPATH段 ——> 环境变量LD_LIBRARY_PATH ——> /etc/ld.so.cache文件列表 ——> /lib/,/usr/lib目录找到库文件后将其载入内存。
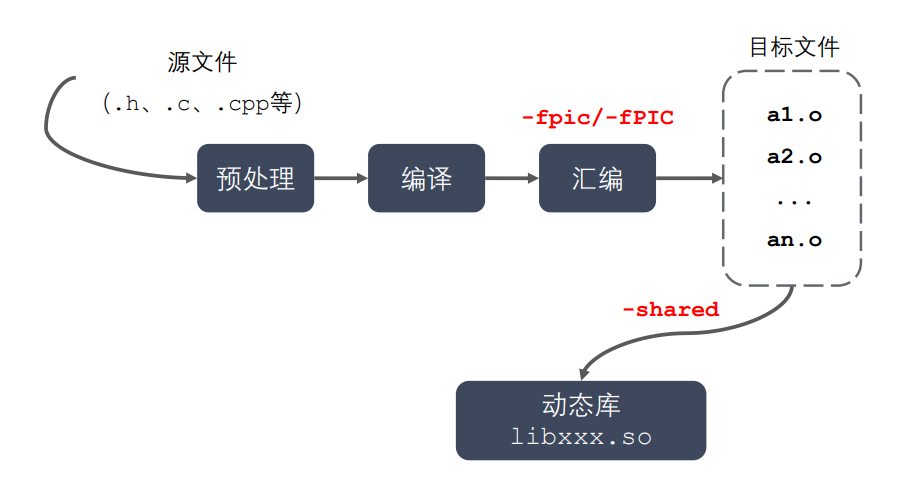
1 2 3 4 5 6 7 动态库的制作 1. 将c文件编译成与位置无关的目标文件.o gcc -c -fpic ./ *.c 2. 将目标文件打包成动态库(共享库) gcc -shared ./ *.o -o libcalc.so
1 2 3 4 5 6 7 8 动态库的使用 1. 对main函数进行编译 gcc mian.c -o app -I include / -L lib/ -l calc 2. 执行app 文件,此时报错 ./app ./app : error while loading shared libraries: libcalc.so : cannot open shared object file : No such file or directory
3 动态库加载失败的原因和解决 用ldd命令,查看动态库的依赖关系ldd app,发现没找到动态库。
1 2 3 4 5 6 7 8 9 10 11 12 13 14 15 16 17 18 19 20 21 22 23 24 25 26 27 28 29 30 配制app要运行的环境变量: 1. 查看环境变量 env 2. 配置LD_LIBRARY_PATH文件 1. 在终端当中配置环境变量 export LD_LABRARY_PATH=$LD_LABRARY_PATH :/home/zhenruyi/linux/lesson06/library/lib 此方法,关了终端之后,再打开就要重新配置。 $ 符号是用来拼接的,保留之前的内容,拼接新的内容 : 符号是用来分割不同路径的 2. 配置用户级别的环境变量 配置文件在/home/zhenruyi/目录下,是.bashrc文件 vim 打开,Shift + G 跳到最后一行,按 o 往下插入一行 添加 export LD_LABRARY_PATH=$LD_LABRARY_PATH :/home/zhenruyi/linux/lesson06/library/lib 刷新更改 . .bashrc 或者 source .bashrc 3. 系统级别 文件是 /etc/profile 3. 配置/etc/ld.so.cache 文件不能通过 vim 直接编辑,因为是二进制文件 打开 sudo vim /etc/ld.so.conf 添加 /home/zhenruyi/linux/lesson06/library/lib 刷新 sudo ldconfig 4. 把库文件放到 /lib/ 或者 /usr/lib 目录下 不建议,因为放着很多系统的库文件
4 静态库和动态库对比 静态库、动态库区别来自链接阶段如何处理,链接成 可执行程序。分别称为静态链接方式和动态链接方式。
静态库的制作过程:
动态库的制作过程:
静态库的优缺点:
静态库被打包到应用程序中加载速度快。
发布程序无需提供静态库,移植方便。
消耗系统资源,浪费内存。
更新、部署、发布麻烦
动态库的优缺点:
可以实现进程间资源共享(共享库);
更新、部署、发布简单;
可以控制何时加载动态库;
加载速度比静态库慢;
发布程序时需要提供依赖的动态库。
四、 Makefile 一个工程中的源文件不计其数,其按类型、功能、模块分别放在若干个目录中, Makefile 文件定义了一系列的规则来指定哪些文件需要先编译,哪些文件需要后编译,哪些文件需要重新编译,甚至于进行更复杂的功能操作,因为 Makefile 文件就像一个 Shell 脚本一样,也可以执行操作系统的命令。
Makefile 带来的好处就是“自动化编译” ,一旦写好,只需要一个 make 命令,整个工程完全自动编译,极大的提高了软件开发的效率。make 是一个命令工具,是一个 解释 Makefile 文件中指令的命令工具,一般来说,大多数的 IDE 都有这个命令, 比如 Delphi 的 make,Visual C++ 的 nmake,Linux 下 GNU 的 make。
1 文件命名、规则和工作原理 命名:makefile或者Makefile。
规则:可以有一条或者多条规则。后面的规则都是为第一条规则服务的。
规则的写法
1 2 3 目标: 依赖 目录(Shell 命令) ...
目标:最终要生成的文件(伪目标除外)。
依赖:生成目标所需要的文件或者目标。
命令:操作。
工作原理:
命令在执行之前,需要先检查规则中的依赖是否存在?
如果存在,执行命令;
如果不存在,向下检查其它的规则,检查有没有一个规则是用来生成这个依赖的, 如果找到了,则执行该规则中的命令。
检测更新,在执行规则中的命令时,会比较目标和依赖文件的时间。
如果依赖的时间比目标的时间晚,需要重新生成目标;
如果依赖的时间比目标的时间早,目标不需要更新,对应规则中的命令不需要被执行。
2 makefile的尝试 makefile 的第一次尝试:
1 2 3 4 5 6 1 . 创建makefile:vim makefile 2 . makefile文件里输入:app:main .c mult.c add.c div .c sub.c gcc main .c mult.c add.c div .c sub.c -o app
makefile 不同写法的效率对比:
1 2 3 4 5 6 7 8 9 10 11 12 13 写法1 app:mult.c add.c div.c sub.c main.c gcc -c mult.c add.c div.c sub.c main.c -o app 写法2 app:mult.o add.o div.o sub.o main.o gcc main.o add.o div.o sub.o mult.o -o app mult.o:mult.c gcc -c mult.c -o sub.o .... 比较 第一种没有第二种好,因为在更新的时候,只用进行某些步骤,不用全部步骤都重新执行。
3 makefile的进阶 变量:
1 2 3 4 5 6 7 8 9 10 11 12 13 14 15 16 17 18 19 20 1. 自定义变量 变量名 = 变量值 2. 预定义变量 AR - 归档维护程序的名称,默认值为ar CC - C编译器的名称,默认值为gcc CXX - C++编译器的名称,默认值为g++ $@ - 目标$< - 第一个依赖$^ - 所有依赖3. 获取变量的值 $(变量名) 4. 举例 app:main.c a.c b.c gcc -c main.c a.c b.c -> app:main.c a.c b.c $(CXX) -c $^ -o $@
模式匹配:
1 2 3 4 % - 通配符,匹配一个字符串。 %.o:%.c gcc -c $< -o $@ 这里的两个%匹配的是同一个字符串。
函数:
1 2 3 4 5 6 7 8 9 10 11 12 13 14 15 16 $(wildcard PATTERN... ) 功能:获取指定目录下指定类型的文件列表。 参数:PATTERN 指的是某个或多个目录下的对应的某种类型的文件,如果有多个目录,一般使用空格间隔。 返回:得到的若干个文件的文件列表,文件名之间使用空格间隔 示例: $(wildcard * .c ./ sub / * .c ) 返回值格式: a.c b.c c.c d.c e.c f.c $(patsubst <pattern >,<replacement >,<text >) 功能:查找<text>中的单词(单词以“空格”、“Tab”或“回车”“换行”分隔)是否符合模式<pattern>,如果匹配的话,则以<replacement>替换。 <pattern>可以包括通配符`%`,表示任意长度的字串。如果<replacement>中也包含`%`,那么,<replacement>中的这个`%`将是<pattern>中的那个%所代表的字串。(可以用`\`来转义,以`\%`来表示真实含义的`%`字符) 返回:函数返回被替换过后的字符串 示例: $(patsubst %.c , %.o , x .c bar .c ) 返回值格式: x.o bar.o
4 makefile的进阶 1 2 3 4 5 6 7 8 9 10 11 12 13 14 15 16 17 18 19 20 21 22 23 24 25 26 27 28 29 30 31 32 33 34 35 36 37 38 39 40 41 42 43 44 45 46 47 48 49 50 51 52 53 54 55 56 57 58 59 60 61 62 63 64 65 66 67 68 69 70 71 72 73 74 75 76 0. 初始 app:add.o main.o mult.o div.o sub.o gcc add.o main.o mult.o div.o sub.o -o app add.o:add.c gcc -c add.c -o add.o main.o:main.c gcc -c main.c -o main.o mult.o:mult.c gcc -c mult.c -o mult.o div.o:div.c gcc -c div.c -o div.o sub.o:sub.c gcc -c sub.c -o sub.o 1. 变量 objname=app dependences=main.c add.c mult.c div.c sub.c $(objname) :$(dependences) $(CC) $(dependences) -o $(objname) objname=app dependences=main.c add.c mult.c div.c sub.c $(objname) :$(dependences) $(CC) $^ -o $@ 2. 模式匹配 objname=app dependences=main.o add.o mult.o div.o sub.o $(objname) :$(dependences) $(CC) $^ -o $@ %.o:%.c $(CC) -c $< -o $@ 3. 函数 src=$(wildcard ./*.c) obj=$(patsubst %.c, %.o, $(src) ) target=app $(target) :$(obj) $(CC) $(obj) -o $(target) %.o:%.c $(CC) -c $< -o $@ 4. 自定义规则 src=$(wildcard ./*.c) sub=$(patsubst %.c, %.o, $(src) ) target=app $(target) :$(sub) $(CC) $(src) -o $(target) %.o:%.c $(CC) -c $< -o $@ clean: rm $(sub) -f > make clean 用法 > clean 错误用法 > make 使用make的时候,不会使用clean,因为第一条规则不需要用到这个规则 5. 伪目标 当目录存在一个clean的文件的时候,使用 make clean 的时候,会提示clean文件无需更新,因为clean没有依赖。 解决办法:使用伪目标 src=$(wildcard ./*.c) sub=$(patsubst %.c, %.o, $(src) ) target=app $(target) :$(sub) $(CC) $(src) -o $(target) %.o:%.c $(CC) -c $< -o $@ .PHONY :cleanclean: rm $(sub) -f
五、 GDB调试 GDB 是由 GNU 软件系统社区提供的调试工具,同 GCC 配套组成了一套完整的开发环境,GDB 是 Linux 和许多类 Unix 系统中的标准开发环境。 一般来说,GDB 主要帮助你完成下面四个方面的功能:
启动程序,可以按照自定义的要求随心所欲的运行程序;
可让被调试的程序在所指定的调置的断点处停住(断点可以是条件表达式) ;
当程序被停住时,可以检查此时程序中所发生的事;
可以改变程序,将一个 BUG 产生的影响修正从而测试其他 BUG。
1 准备工作 通常,在为调试而编译时,我们会关掉编译器的优化选项(-O), 并打开调试选项(-g)。另外,-Wall在尽量不影响程序行为的情况下选项打开所有 warning,也可以发现许多问题,避免一些不必要的 BUG。
gcc -g -Wall program.c -o program。
-g 选项的作用是在可执行文件中加入源代码的信息,比如可执行文件中第几条机 器指令对应源代码的第几行,但并不是把整个源文件嵌入到可执行文件中,所以在调试时必须保证 gdb 能找到源文件。
2 启动、退出和查看 1 2 3 4 5 6 7 8 9 10 11 12 13 14 15 16 17 18 19 20 21 22 23 1. 启动和退出gdb program quit 2. 帮助help 3. 查看当前文件代码list/l l 行号 l 函数名 4. 查看非当前文件代码l 文件名:行号 l 文件名:函数名 5. 设置显示的行号show listsize/list set list 行数 6. 给程序设置参数/获取设置参数set args 10 20 show args
3 断点 1 2 3 4 5 6 7 8 9 10 11 12 13 14 15 16 17 18 1 . 设置断点b/break 行号 b 函数名 b 文件名:行号 b 文件名:函数 2 . 查看断点i/info b/ break 3 . 删除断点d/del/ delete 断点编号 4 . 设置断点无效/生效dis/disable 断点编号 ena/enable 断点编号 5 . 设置条件断点(一般在循环位置)b/break 编号 if i==5
4 调试 1 2 3 4 5 6 7 8 9 10 11 12 13 14 15 16 17 18 19 20 21 22 23 24 25 26 1. 运行start(程序停在第一行) run(遇到下一个断点) 2. 继续运行,到下一个断点停止c/continue 3. 执行一行代码,不会进入函数体n/next 4. 执行一行代码(单步),会进入函数体s/step finish(跳出函数体) 5. 变量操作p/print 变量名(打印变量值) ptype 变量名(打印变量类型) 6. 自动变量操作display 变量名(自动打印变量的值) i/info display undisplay 编号 7. 其他set var 变量名=变量值 until(跳出循环)
5 其他 1 2 3 4 5 6 7 8 9 10 11 12 比较两个文件的信息 ll -h file1 file2 往可执行文件添加参数 ./app para1 para2... 查看帮助信息 help + cmdhelp set vim内设置行号 set num
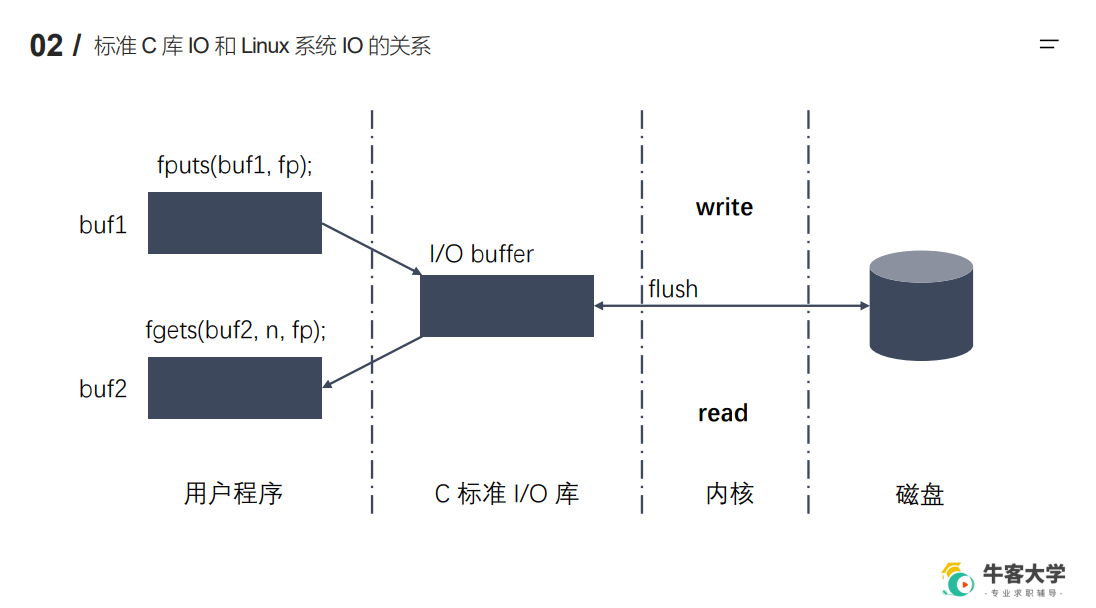
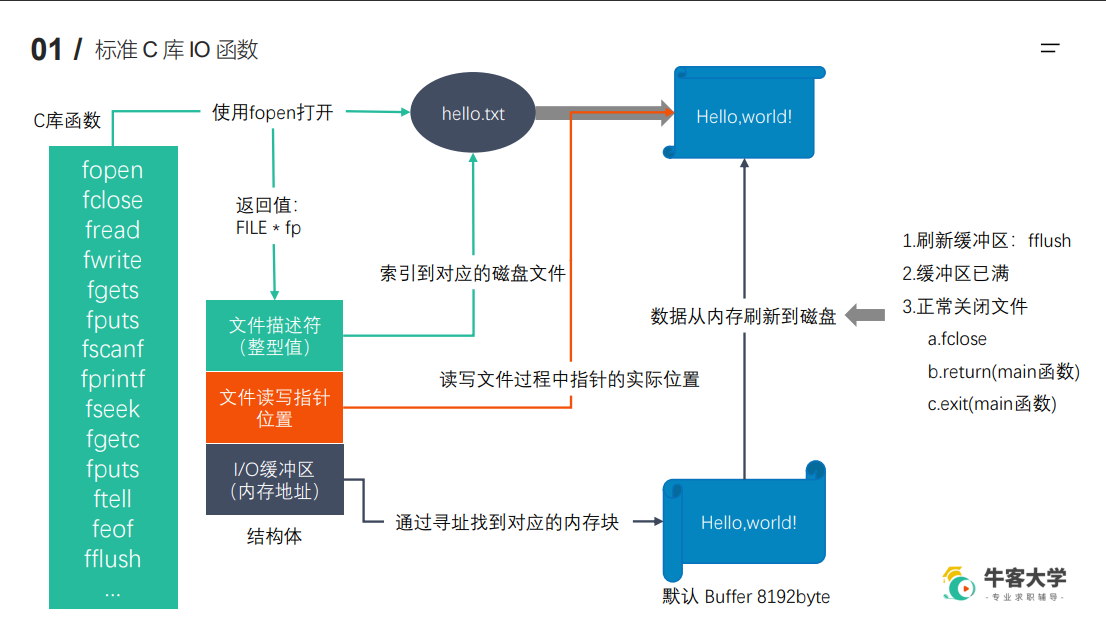
六、文件IO概述 1. 标准C库IO函数和Linux系统IO函数的对比
2. 标准C库IO函数
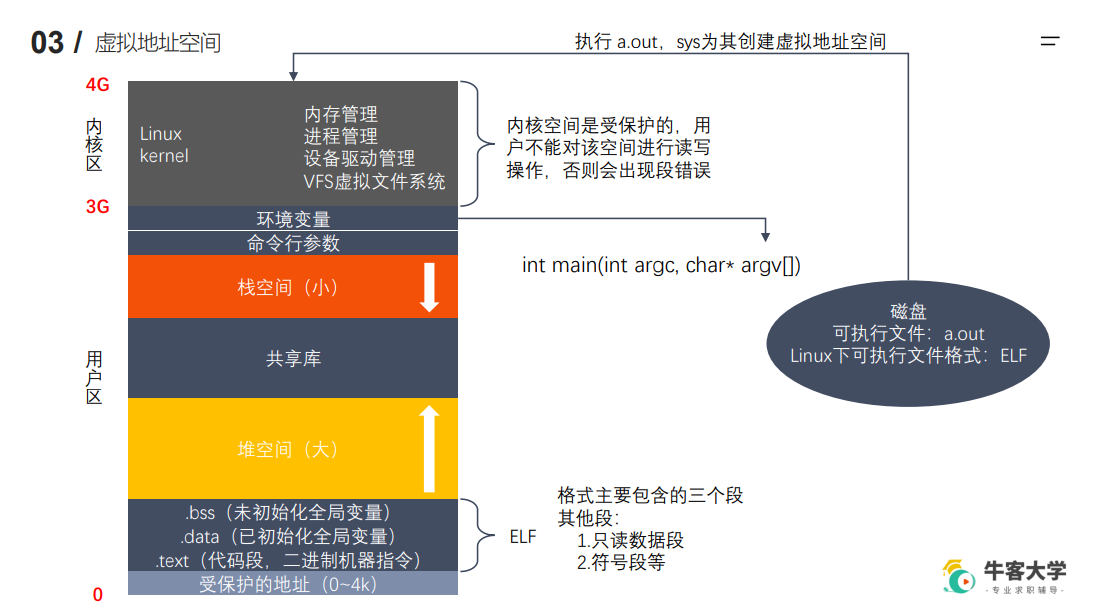
3. 虚拟地址空间 使用物理地址来管理内存十分不方便,所以有了虚拟地址空间的概念。
目的:解决内存的分配;
进程是系统分配资源的最小单位,程序在内存中是进程,在磁盘上是程序。
虚拟地址空间被CPU的MMU(逻辑管理单元)映射到物理内存上。
分为用户区和内核区,用户只能在用户区进行操作,如果需要访问内核区,则需要调用Linux的系统函数(API)。内核区是高地址开始的。
用户区又划分为:
受保护的地址:null,null pointer。
可执行文件ELF:代码段和全局变量。
堆空间(地址从低到高):malloc,new。
栈空间(地址从高到低):局部变量,函数。
共享库:动态库,静态库。
环境变量env,命令行参数main(int argc, char *argv[])。
4. 文件描述符 在Linux系统中,一切皆文件,硬件设备也会被虚拟成一个文件,通过文件进行管理。windows里通过扩展名来区分文件类型的。linux里文件扩展名和文件类型没有关系。但为了容易区分和兼容用户使用windows的习惯,我们还是会用扩展名来表示文件类型。Linux下有七种文件类型:
普通文件:最常使用的,特点是不包含有结构信息(文件系统信息)。用户接触到的文件,比如图形、数据、文档以及声音文件都属于这种文件,按照其内部结构又可以分为:
纯文本文件(ASCII):设置文件几乎都属于这种类型。
二进制文件(Binary):可执行文件。
数据格式的文件(data):有些程序在运行过程中,会读取某些特定格式的文件,那些特定格式的文件可以称为数据文件(data file)。
各种压缩文件。
目录文件:用于存放文件名以及其相关信息的文件,是内核组织文件系统的基本节点。目录文件可以包含下一级文件目录或者普通文件,在Linux中,目录文件是一种文件。
块设备文件:就是存储数据以供系统存取的接口设备,简单而言就是硬盘。例如一号硬盘的代码是 /dev/hda1等文件。
字符设备:即串行端口的接口设备,例如键盘、鼠标等等。
套接字文件:这类文件通常用在网络数据连接。可以启动一个程序来监听客户端的要求,客户端就可以通过套接字来进行数据通信。
管道文件:是一种很特殊的文件,主要用于不同进程的信息传递。当两个进程需要进行数据或者信息传递时,可以使用通道文件,一个进程将需要传递的数据或者信息写入管道的一端,另一进程从管道的另一端取得所需要的数据或者信息,通常管道是建立在调整缓存中。
链接文件:是一种特殊文件,指向一个真实存在的文件链接,类似于Windows下的快捷方式,链接文件的不同,又可分为硬链接文件和符号链接文件。
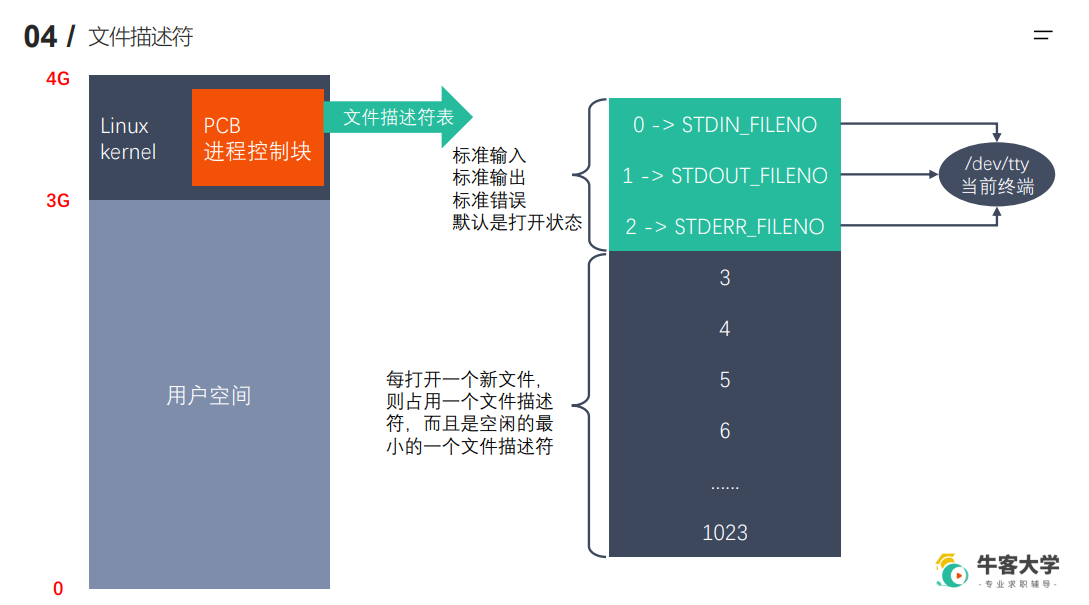
文件在磁盘,运行起来才是进程,访问文件需要,文件描述符定位文件。内核也是一个进程,内核为管理每一个进程,为每一个进程设置了一个进程控制块(PCB),每个PCB有一个文件描述符表,用来管理文件。
文件描述符表是一个数组,大小为1024,即一个进程最多打开1024个文件。
每个进程有三个文件是默认打开的(标准输入、输出和错误),指向当前的终端。
一个文件可以打开多次,每次文件描述符都不一样,使用close可以释放。
七、 Linux系统IO函数 使用man 2 函数名,可以快速查询,使用/可以快速定位,例如/return value定位到返回值的介绍。
1. open函数打开文件 使用man 2 open 获得open函数的信息:
1 2 3 4 5 #include <sys/types.h> #include <sys/stat.h> #include <fcntl.h> int open (const char *pathname, int flags) int open (const char *pathname, int flags, mode_t mode)
调用一个函数为什么使用三个头文件?因为flags里面可以选择参数来设置访问的权限,这些参数是宏,被定义在了两个头文件中。
C语言没有函数重载,所以这里不是重载,而是通过可变参数实现的同一个函数。
1 2 3 4 5 6 7 8 9 10 11 12 int open (const char *pathname, int flags) 参数: - pathname:要打开的文件路径 - flags:对文件的操作权限设置还有其他设置 O_RDONLY, O_WRONLY, or O_RDWR,三个操作是互斥的 返回值: - 返回一个新的文件描述符 - 调用失败则返回-1 ,并设置errno #include <unistd.h> int close (int fd) 关闭打开的文件
1 2 3 4 5 errno:属于Linux系统函数库,是一个全局变量,记录最近的错误号。 #include <stdio.h> void perror (const char *s) 作用:打印errno对应的错误描述 参数:用户描述,比如hi,最终输出为hi:xxx (实际的错误描述)
写一个程序测试:
1 2 3 4 5 6 7 8 9 10 11 12 13 14 15 16 17 18 #include <sys/types.h> #include <sys/stat.h> #include <fcntl.h> #include <stdio.h> #include <unistd.h> int main () { int fd = open("t.txt" , O_RDONLY); if (fd == -1 ) { perror("open error" ); } close(fd); return 0 ; }
2. open函数创建文件 man 2 open:
1 2 3 4 #include <sys/types.h> #include <sys/stat.h> #include <fcntl.h> int open (const char *pathname, int flags, mode_t mode)
参数:
pathname:创建的文件路径
flags:对文件的操作权限和其他设置
必选项:O_RDONLY, O_WRONLY, or O_RDWR
可选项:完整列表列出很多,重点关注O_CREATE,文件不存在,创建新文件
flags参数是一个整数,4个字节,32位。可以有多个选项,使用按位或来连接。32位,每一位都表示一个模式,所以按位或之后得到的是总的模式。
mode:八进制的数,表示创建出的新文件的操作权限。
比如:0775(八进制开头为0)。
操作权限:-rwxrwxrw-,第一个表示文件/文件夹,前三位(八进制用三位表当前用户,中间三位同组用户,后三位其他组用户。
最终的权限数字:mode & ~umask,(umask=0002,不同的用户不同)
~0002 = 0777 - 0002 = 0775
0777 & 0775 = 0775
输入0777结果得到0775,权限少了一些。
umask的作用是抹去某些权限,使权限更合理。
1 2 3 4 5 6 7 8 9 10 11 12 13 14 #include <sys/types.h> #include <sys/stat.h> #include <fcntl.h> #include <unistd.h> #include <stdio.h> int main () { int fd = open("create.txt" , O_RDWR | O_CREAT, 0777 ); if (fd == -1 ) { perror("open error" ); } close(fd); return 0 ; }
3. read、write函数 1 2 3 4 5 #include <unistd.h> ssize_t read (int fd, void *buf, size_t count) ;#include <unistd.h> ssize_t write (int fd, const void *buf, size_t count) ;
1 2 3 4 5 6 7 8 9 ssize_t read (int fd, void *buf, size_t count) 参数: - fd:文件描述符,open得到的。 - buf:需要读取数据存放的地方,数组的地址(传出参数) - count:指定数组的大小。 返回值: - >0 :读到的字节数 - =0 :文件读完了 - -1 :失败,并设置errno
1 2 3 4 5 6 7 8 9 #include <unistd.h> ssize_t write (int fd, const void *buf, size_t count) 参数: - fd:文件描述符 - buf:写入的数据,数组 - count:写的数据的实际大小 返回值: - 成功:实际的写入的字节数 - 失败:-1 ,并设置errno
1 2 3 4 5 6 7 8 9 10 11 12 13 14 15 16 17 18 19 20 21 22 23 24 25 26 27 28 29 30 31 32 #include <unistd.h> #include <stdio.h> #include <sys/types.h> #include <sys/stat.h> #include <fcntl.h> int main () { int srcfd = open("english.txt" , O_RDONLY); if (srcfd == -1 ) { perror("open" ); return -1 ; } int dstfd = open("cpy.txt" , O_RDWR | O_CREAT, 0664 ); if (dstfd == -1 ) { perror("open" ); return -1 ; } char buf[1024 ] = {0 }; int len = 0 ; while ((len = read(srcfd, buf, sizeof (buf))) > 0 ) { write(dstfd, buf, len); } close(dstfd); close(srcfd); return 0 ; }
4. lseek函数 1 2 3 4 5 6 7 8 标准C库的函数 #include <stdio.h> int fseek (FILE *stream, long offset, int whence) Linux系统函数 #include <sys/types.h> #include <unistd.h> off_t lseek (int fd, off_t offset, int whence)
1 2 3 4 5 6 7 8 9 10 11 12 13 14 15 16 off_t lseek (int fd, off_t offset, int whence); 重定位已打开文件的偏移量 参数: - fd:文件描述符 - offset:偏移量 - whence: SEEK_SET:将偏移量设为offset SEEK_CUR:当前位置+offset SEEk_END:文件大小+offset 返回值:返回最终所在的位置 作用: - 移动文件指针到开头,重新操作。lseek (fd, 0 , SEEK_SET) - 获取当前文件指针的位置。lssek (fd, 0 , SEEK_CUR) - 获取文件长度。lseek (fd, 0 , SEEK_END) - 扩展文件长度。lseek (fd, 100 , SEEK_END),扩展100 字节 下载文件的时候,先扩展,即写入零数据,然后再慢慢覆盖,这样就不会产生空间不足的情况。
扩展文件,实际上写入了一些空字节NUL。
1 2 3 4 5 6 7 8 9 10 11 12 13 14 15 16 17 18 19 20 21 22 23 24 25 26 #include <sys/types.h> #include <sys/stat.h> #include <unistd.h> #include <fcntl.h> #include <stdio.h> int main () { int fd = open("hello.txt" , O_RDWR); if (fd == -1 ) { perror("open" ); return -1 ; } int ret = lseek(fd, 100 , SEEK_END); if (ret == -1 ) { perror("lseek" ); return -1 ; } write(fd, " " , 1 ); close(fd); return 0 ; }
5. stat、lstat函数 Linux下可以使用stat查看文件的信息。> stat filename
1 2 3 4 5 6 7 8 #include <sys/types.h> #include <sys/stat.h> #include <unistd.h> 和stat完全相同的,只是路径变成了文件标识符 int fstat (int fd, struct stat *statbuf) ;int stat (const char *pathname, struct stat *statbuf) ;
1 2 3 4 5 6 7 8 int stat (const char *pathname, struct stat *statbuf) ; 作用:获取文件的相关信息 参数: - pathname:文件路径 - statbuf:结构体变量,传出参数,保存获取的文件信息 返回值: 成功:0 失败:返回-1 ,设置errno
下面这个函数跟stat相同,但是stat获取的是该文件的软连接指向的原文件的信息,而下面这个函数获取的是软连接的文件的信息。
创建软连接:ln -s a.txt b.txt创建一个文件b.txt,指向a.txt。
1 int lstat (const char *pathname, struct stat *statbuf) ;
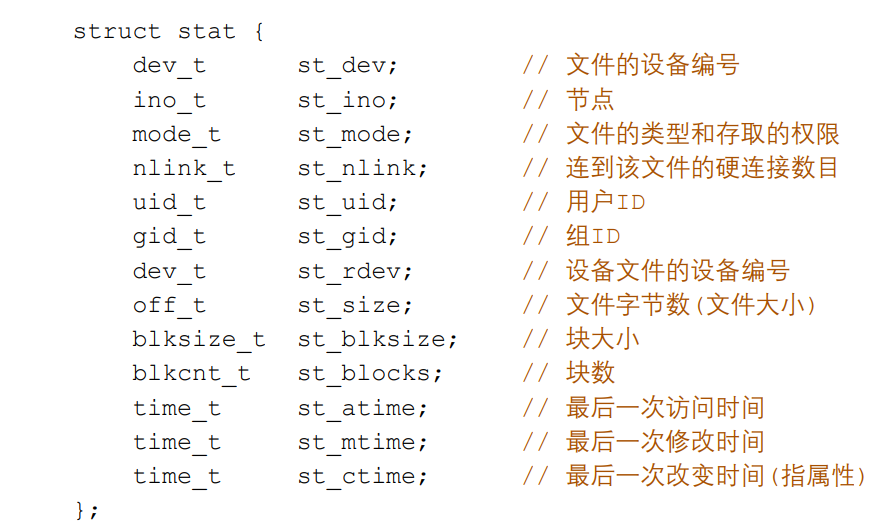
stat是一个结构体,包含如下信息:
1 2 3 4 5 6 7 8 9 10 11 12 struct stat { dev_t st_dev; ID of device containing file ino_t st_ino; Inode number mode_t st_mode; File type and mode nlink_t st_nlink; Number of hard links uid_t st_uid; User ID of owner gid_t st_gid; Group ID of owner dev_t st_rdev; Device ID (if special file) off_t st_size; Total size, in bytes blksize_t st_blksize; Block size for filesystem I/O blkcnt_t st_blocks; Number of 512B blocks allocated }
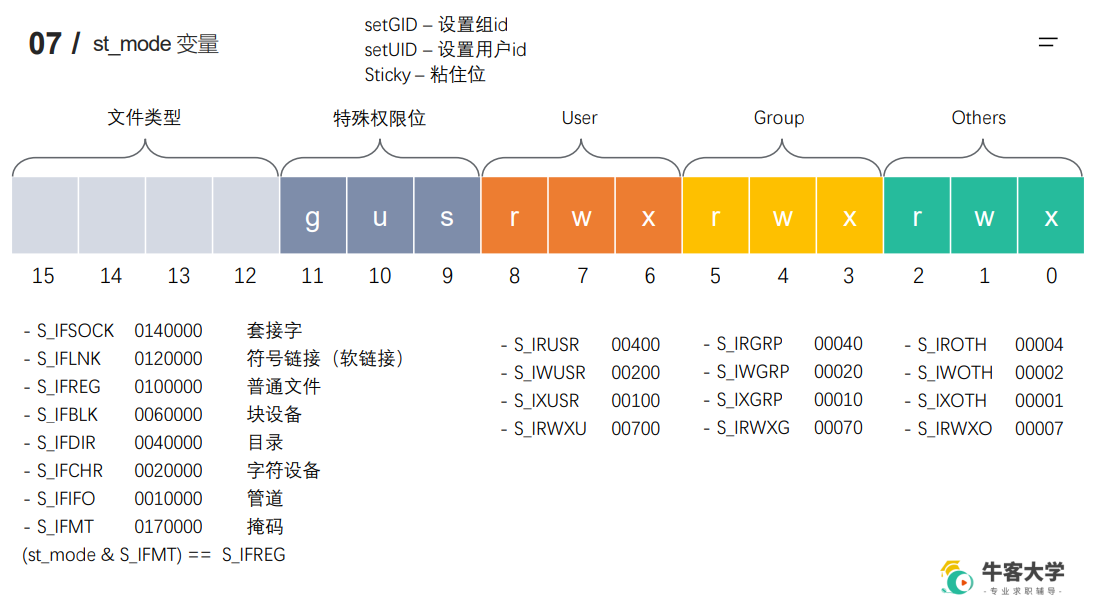
stat结构体里面有个st_mode变量,保存的是文件的类型和权限。和掩码进行按位与运算就能得到结果。
1 2 3 4 5 6 7 8 9 10 11 12 13 14 15 16 #include <sys/types.h> #include <sys/stat.h> #include <unistd.h> #include <stdio.h> int main () { struct stat statbuf ; int ret = stat("a.txt" , &statbuf); if (ret == -1 ) { perror("stat" ); return -1 ; } printf ("size: %ld\n" , statbuf.st_size); return 0 ; }
6. 模拟实现ls -l 命令 1 2 3 4 5 6 7 8 9 10 11 12 13 14 15 16 17 18 19 20 21 22 23 24 25 26 27 28 29 30 31 32 33 34 35 36 37 38 39 40 41 42 43 44 45 46 47 48 49 50 51 52 53 54 55 56 57 58 59 60 61 62 63 64 65 66 67 68 69 70 71 72 73 74 75 76 77 78 79 80 81 82 83 84 85 86 87 88 89 90 91 92 93 94 #include <stdio.h> #include <sys/types.h> #include <sys/stat.h> #include <unistd.h> #include <pwd.h> #include <grp.h> #include <time.h> #include <string.h> int main (int argc, char *argv[]) { if (argc < 2 ) { printf ("%s filename\n" , argv[0 ]); return -1 ; } struct stat st ; int ret = stat(argv[1 ], &st); if (ret == -1 ) { perror("stat" ); return -1 ; } char perms[11 ] = {0 }; switch (st.st_mode & S_IFMT) { case S_IFLNK: perms[0 ] = '1' ; break ; case S_IFDIR: perms[0 ] = 'd' ; break ; case S_IFREG: perms[0 ] = '-' ; break ; case S_IFBLK: perms[0 ] = 'b' ; break ; case S_IFCHR: perms[0 ] = 'c' ; break ; case S_IFSOCK: perms[0 ] = 's' ; break ; case S_IFIFO: perms[0 ] = 'p' ; break ; default : perms[0 ] = '?' ; break ; } perms[1 ] = (st.st_mode & S_IRUSR) ? 'r' : '-' ; perms[2 ] = (st.st_mode & S_IWUSR) ? 'w' : '-' ; perms[3 ] = (st.st_mode & S_IXUSR) ? 'x' : '-' ; perms[4 ] = (st.st_mode & S_IRGRP) ? 'r' : '-' ; perms[5 ] = (st.st_mode & S_IWGRP) ? 'w' : '-' ; perms[6 ] = (st.st_mode & S_IXGRP) ? 'x' : '-' ; perms[7 ] = (st.st_mode & S_IROTH) ? 'r' : '-' ; perms[8 ] = (st.st_mode & S_IWOTH) ? 'w' : '-' ; perms[9 ] = (st.st_mode & S_IXOTH) ? 'x' : '-' ; int linkNum = st.st_nlink; char * fileUser = getpwuid(st.st_uid)->pw_name; char * fileGrp = getgrgid(st.st_gid)->gr_name; long int fileSize = st.st_size; char * time = ctime(&st.st_mtim); char mtime[512 ] = {0 }; strncpy (mtime, time, strlen (time) - 1 ); char buf[1024 ]; sprintf (buf, "%s %d %s %s %ld %s %s" , perms, linkNum, fileUser, fileGrp, fileSize, mtime, argv[1 ]); printf ("%s\n" , buf); return 0 ; }
八、 文件属性操作函数 1. access函数 1 2 3 4 5 6 7 8 9 10 11 #include <unistd.h> int access (const char *pathname, int mode) ; 作用:判断文件是否有某个权限,或者判断文件是否存在 参数: - pathname:路径 - mode: R_OK:判断是否有读权限 W_OK:写 X_OK:执行 F_OK:是否存在 返回值:成功返回0 ,失败返回-1
1 2 3 4 5 6 7 8 9 10 11 12 13 14 #include <unistd.h> #include <stdio.h> int main () { int ret = access("a.txt" , F_OK); if (ret == -1 ) { perror("aceess" ); return -1 ; } printf ("exist!" ); return 0 ; }
2. chmod函数 1 2 3 4 5 #include <sys/stat.h> int fchmod (int fd, mode_t mode) ;int chmod (const char *pathname, mode_t mode) ; 修改文件权限为mode
1 2 3 4 5 6 7 #include <sys/stat.h> int main () { int ret = chmod("a.txt" , 0775 ); return 0 ; }
3. chown函数 1 2 3 4 5 6 7 8 9 vim /etc/passwd 查看所有的用户 vim /etc/group 查看所有的组 sudo useradd gaogao 添加gaogao用户 id gaogao 查看goagao用户信息
1 2 #include <unistd.h> int chown (const char *pathname, uid_t owner, gid_t group) ;
4. truncate函数 1 2 3 4 5 6 7 8 9 #include <unistd.h> #include <sys/types.h> int truncate (const char *path, off_t length) ; truncate:截断。缩减或者扩展文件的尺寸至指定大小 参数: - path - length:最终变成的大小,字节 返回值:成功返回0 ,失败返回-1
1 2 3 4 5 6 7 8 9 10 11 12 #include <unistd.h> #include <sys/types.h> #include <stdio.h> int main () { int ret = truncate("a.txt" , 20 ); if (ret == -1 ) { perror("truncate" ); return -1 ; } return 0 ; }
九、 目录操作函数 1. rename函数 1 2 #include <stdio.h> int rename (const char *oldpath, const char *newpath) ;
1 2 3 4 5 6 7 8 9 #include <stdio.h> int main () { int ret = rename("aaa" , "bbb" ); if (ret == -1 ) { perror("rename" ); return -1 ; } return 0 ; }
2. chdir函数和getcwd函数 1 2 3 4 5 6 7 8 9 10 11 12 #include <unistd.h> int chdir (const char *path) ; 作用:修改进程的工作目录。比如在/home/nowcoder 启动了一个可执行程序a.out, 进程的工作目录 /home/nowcoder。 参数:path : 需要修改的工作目录。 #include <unistd.h> char *getcwd (char *buf, size_t size) ; 作用:获取当前工作目录 参数: - buf : 存储的路径,指向的是一个数组(传出参数) - size: 数组的大小 返回值:返回的指向的一块内存,这个数据就是第一个参数。
1 2 3 4 5 6 7 8 9 10 11 12 13 14 15 16 17 18 19 20 21 22 23 24 25 26 27 28 29 30 31 32 33 34 35 36 #include <unistd.h> #include <stdio.h> #include <sys/stat.h> #include <sys/types.h> #include <fcntl.h> int main () { char buf[128 ]; getcwd(buf, sizeof (buf)); printf ("当前的工作目录是:%s\n" , buf); int ret = chdir("/home/nowcoder/Linux/lesson13" ); if (ret == -1 ) { perror("chdir" ); return -1 ; } int fd = open("chdir.txt" , O_CREAT | O_RDWR, 0664 ); if (fd == -1 ) { perror("open" ); return -1 ; } close(fd); char buf1[128 ]; getcwd(buf1, sizeof (buf1)); printf ("当前的工作目录是:%s\n" , buf1); return 0 ; }
3. mkdir函数 1 2 3 4 5 6 7 8 #include <sys/stat.h> #include <sys/types.h> int mkdir (const char *pathname, mode_t mode) ; 作用:创建一个目录 参数: pathname: 创建的目录的路径 mode: 权限,八进制的数 返回值:成功返回0 , 失败返回-1
1 2 3 4 5 6 7 8 9 10 11 int main () { int ret = mkdir("aaa" , 0777 ); if (ret == -1 ) { perror("mkdir" ); return -1 ; } return 0 ; }
十、 目录遍历函数 1 2 3 4 5 6 7 8 9 10 11 12 13 14 15 16 17 18 19 20 21 22 23 #include <sys/types.h> #include <dirent.h> DIR *opendir (const char *name) ; 参数: - name: 需要打开的目录的名称 返回值: DIR * 类型,理解为目录流 错误返回NULL #include <dirent.h> struct dirent *readdir (DIR *dirp) ; - 参数:dirp是opendir返回的结果 - 返回值: struct dirent ,代表读取到的文件的信息 读取到了末尾或者失败了,返回NULL // 关闭目录 #include < sys/types.h>#include <dirent.h> int closedir (DIR *dirp) ;
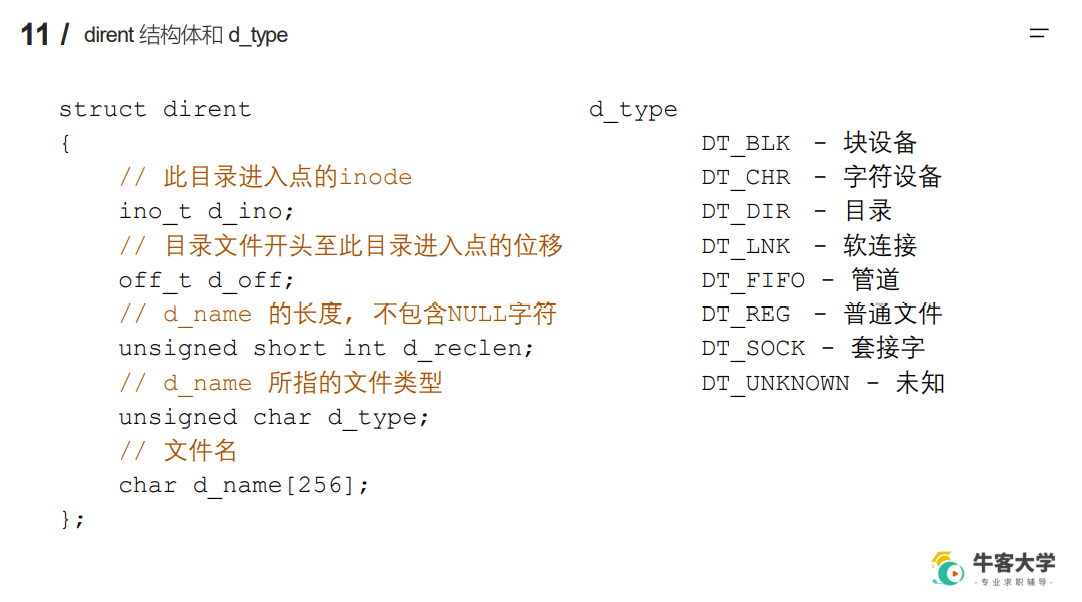
1 2 3 4 5 6 7 8 9 10 11 12 13 14 15 16 17 18 19 20 21 22 23 24 25 26 27 28 29 30 31 32 33 34 35 36 37 38 39 40 41 42 43 44 45 46 47 48 49 50 51 52 53 #include <sys/types.h> #include <dirent.h> #include <stdio.h> #include <string.h> #include <stdlib.h> int getFileNum (const char * path) ;int main (int argc, char * argv[]) { if (argc < 2 ) { printf ("%s path\n" , argv[0 ]); return -1 ; } int num = getFileNum(argv[1 ]); printf ("普通文件的个数为:%d\n" , num); return 0 ; } int getFileNum (const char * path) { DIR * dir = opendir(path); if (dir == NULL ) { perror("opendir" ); exit (0 ); } struct dirent *ptr ; int total = 0 ; while ((ptr = readdir(dir)) != NULL ) { char * dname = ptr->d_name; if (strcmp (dname, "." ) == 0 || strcmp (dname, ".." ) == 0 ) { continue ; } if (ptr->d_type == DT_DIR) { char newpath[256 ]; sprintf (newpath, "%s/%s" , path, dname); total += getFileNum(newpath); } if (ptr->d_type == DT_REG) { total++; } } closedir(dir); return total; }
十一、 复制文件描述符 1 2 3 4 5 6 #include <unistd.h> int dup (int oldfd) ; 作用:复制一个新的文件描述符 fd=3 , int fd1 = dup(fd), fd指向的是a.txt, fd1也是指向a.txt 从空闲的文件描述符表中找一个最小的,作为新的拷贝的文件描述符
1 2 3 4 5 6 7 8 9 10 11 12 13 14 15 16 17 18 19 20 21 22 23 24 25 26 27 28 29 30 31 32 33 #include <unistd.h> #include <stdio.h> #include <fcntl.h> #include <sys/types.h> #include <sys/stat.h> #include <string.h> int main () { int fd = open("a.txt" , O_RDWR | O_CREAT, 0664 ); int fd1 = dup(fd); if (fd1 == -1 ) { perror("dup" ); return -1 ; } printf ("fd : %d , fd1 : %d\n" , fd, fd1); close(fd); char * str = "hello,world" ; int ret = write(fd1, str, strlen (str)); if (ret == -1 ) { perror("write" ); return -1 ; } close(fd1); return 0 ; }
1 2 3 4 5 6 7 #include <unistd.h> int dup2 (int oldfd, int newfd) ; 作用:重定向文件描述符 oldfd 指向 a.txt, newfd 指向 b.txt 调用函数成功后:newfd 和 b.txt 做close, newfd 指向了 a.txt oldfd 必须是一个有效的文件描述符 oldfd和newfd值相同,相当于什么都没有做
1 2 3 4 5 6 7 8 9 10 11 12 13 14 15 16 17 18 19 20 21 22 23 24 25 26 27 28 29 30 31 32 33 34 35 36 37 38 39 40 41 42 43 44 45 #include <unistd.h> #include <stdio.h> #include <string.h> #include <sys/stat.h> #include <sys/types.h> #include <fcntl.h> int main () { int fd = open("1.txt" , O_RDWR | O_CREAT, 0664 ); if (fd == -1 ) { perror("open" ); return -1 ; } int fd1 = open("2.txt" , O_RDWR | O_CREAT, 0664 ); if (fd1 == -1 ) { perror("open" ); return -1 ; } printf ("fd : %d, fd1 : %d\n" , fd, fd1); int fd2 = dup2(fd, fd1); if (fd2 == -1 ) { perror("dup2" ); return -1 ; } char * str = "hello, dup2" ; int len = write(fd1, str, strlen (str)); if (len == -1 ) { perror("write" ); return -1 ; } printf ("fd : %d, fd1 : %d, fd2 : %d\n" , fd, fd1, fd2); close(fd); close(fd1); return 0 ; }
1 2 3 4 5 6 7 8 9 10 11 12 13 14 15 16 17 18 19 20 #include <unistd.h> #include <fcntl.h> int fcntl (int fd, int cmd, ...) 参数: fd : 表示需要操作的文件描述符 cmd: 表示对文件描述符进行如何操作 - F_DUPFD : 复制文件描述符,复制的是第一个参数fd,得到一个新的文件描述符(返回值) int ret = fcntl (fd, F_DUPFD); - F_GETFL : 获取指定的文件描述符文件状态flag 获取的flag和我们通过open函数传递的flag是一个东西。 - F_SETFL : 设置文件描述符文件状态flag 必选项:O_RDONLY, O_WRONLY, O_RDWR 不可以被修改 可选性:O_APPEND, O)NONBLOCK O_APPEND 表示追加数据 NONBLOK 设置成非阻塞 阻塞和非阻塞:描述的是函数调用的行为。
1 2 3 4 5 6 7 8 9 10 11 12 13 14 15 16 17 18 19 20 21 22 23 24 25 26 27 28 29 30 31 32 33 34 35 36 37 38 39 40 #include <unistd.h> #include <fcntl.h> #include <stdio.h> #include <string.h> int main () { int fd = open("1.txt" , O_RDWR); if (fd == -1 ) { perror("open" ); return -1 ; } int flag = fcntl(fd, F_GETFL); if (flag == -1 ) { perror("fcntl" ); return -1 ; } flag |= O_APPEND; int ret = fcntl(fd, F_SETFL, flag); if (ret == -1 ) { perror("fcntl" ); return -1 ; } char * str = "nihao" ; write(fd, str, strlen (str)); close(fd); return 0 ; }

